![How to Setup Polygon [MATIC] on MetaMask?](http://s3.amazonaws.com/appforest_uf/f1645718832368x981332789904377600/How%20to%20Add%20Polygon%20%5BMATIC%5D%20on%20MetaMask_.jpg)
No doubt, Polygon is gaining much importance in the crypto world. Previously referred to as Matic Network, Polygon is now popular for its lower fees, faster processing, and impressive scaling solutions. Unfortunately, Polygon isn’t listed in the ‘Network List’ of your MetaMask wallet. Hence, you have to add it yourself. If you wonder how to setup Polygon on MetaMask, this tutorial can be more than helpful. Here, we have explained the complete procedure in an easy to understand manner.
What is Polygon (Previously Matic Network)
Polygon is a protocol for creating and connecting blockchain networks that are compatible with an EVM (Ethereum Virtual Machine). To put it simply, Polygon is also referred to as an L2 (Layer2) chain, which acts as an additional scaling solution for Ethereum. These L2 chains offer a variety of advantages, as they work on existing blockchains. For instance, the Polygon or Matic Network serves as a substitute to the Ethereum network.
Ethereum is capable of processing only 14 transactions every second. Besides, each of these transactions may cost between $25 and $1000. The reason for such volatility is the high network congestion. This is the most common issue that most of the users experience when they try to transfer tokens or use Ethereum-based smart contracts. In some cases, the gas fees may surge up quickly, costing hundreds to thousands of dollars.
Since Ethereum tends to be an expensive and slower option, you can rely on Polygon for a faster and better experience. In other words, Polygon serves as an alternative scaling solution that works well with your MetaMask wallet.
It is capable of processing almost 65,000 transactions per second, which is much faster when compared to Ethereum. In addition, Polygon also proves to be a cheaper option. Polygon or Matic Network takes advantage of its proprietary Proof-of-Stake (POS) blockchain while processing batches of transactions.
This results in lowering the overall cost of a transaction. For instance, you just need to pay a fraction of the amount that you may have to pay when making a single transaction through Ethereum.
After giving you a brief overview of the Polygon or Matic network, it’s time to learn how to add this network to your existing MetaMask wallet.
How to Add Polygon to MetaMask?
For those who aren’t familiar with MetaMask, they are recommended to take a look at our blog “What is a MetaMask Wallet & How to Create it?”
Installing MetaMask on your Browser
If you don’t have installed MetaMask on your browser, make sure to follow the steps listed below. On the contrary, if you are already using MetaMask, just skip this section.
- To start with, just go to the official website of MetaMask and download the extension. It is compatible with a wide range of browsers including Firefox, Chrome, Edge, and Brave. MetaMask also works with both Android and iOS devices.
- By simply following the instructions, you can easily create a MetaMask wallet. However, you must be careful when storing the backup seed phrase. Make sure to write it down on paper other than saving it on your computer.
With this, you have successfully created a MetaMask wallet.
Adding Polygon to MetaMask
With a view to setup Polygon on desktop, click on the MetaMask extension on your browser and follow these steps.
- Click on your profile image on the top right. And go to Settings.
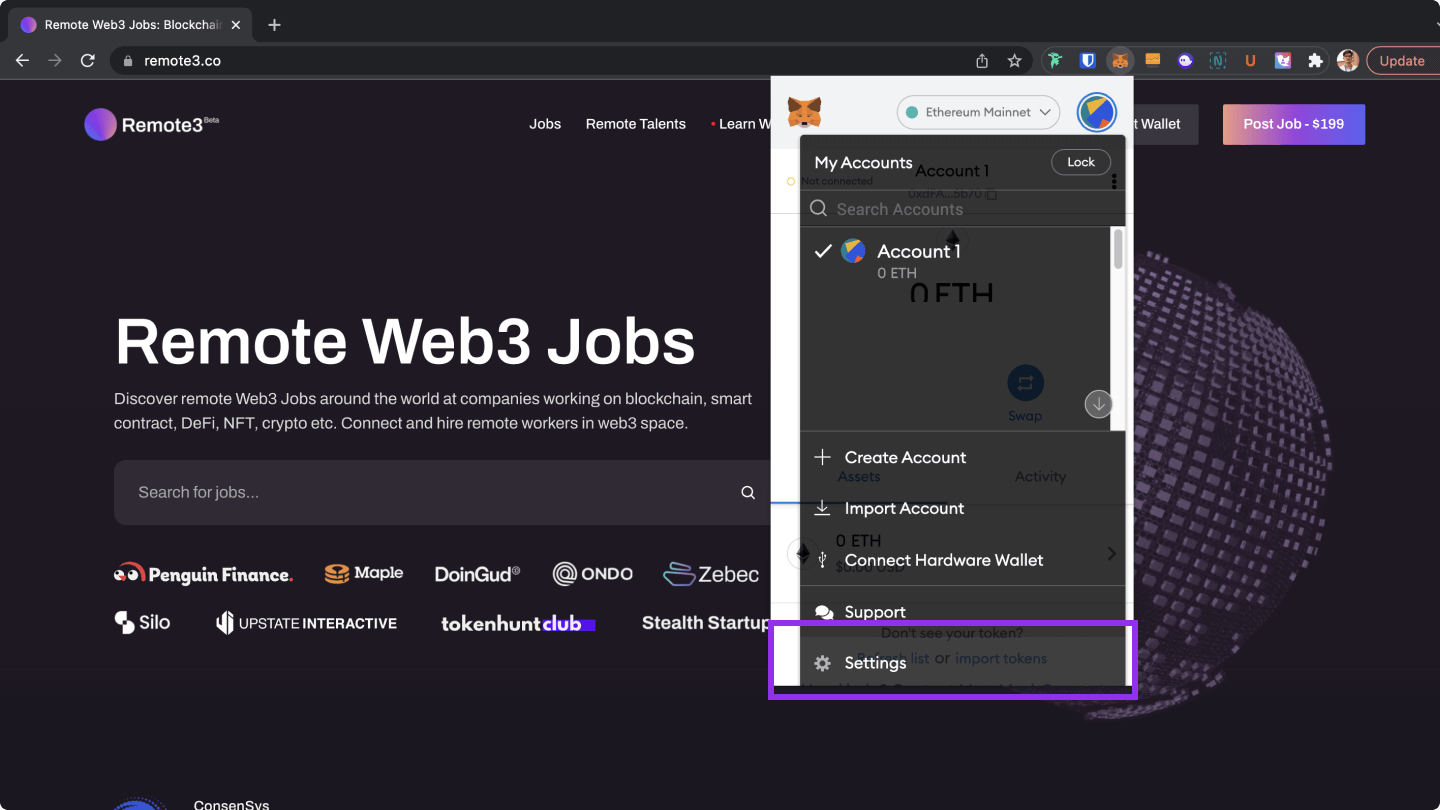
- Scroll down to the bottom until you see the “Networks” option. Click on Networks.
- Now just click on the “Add Network”
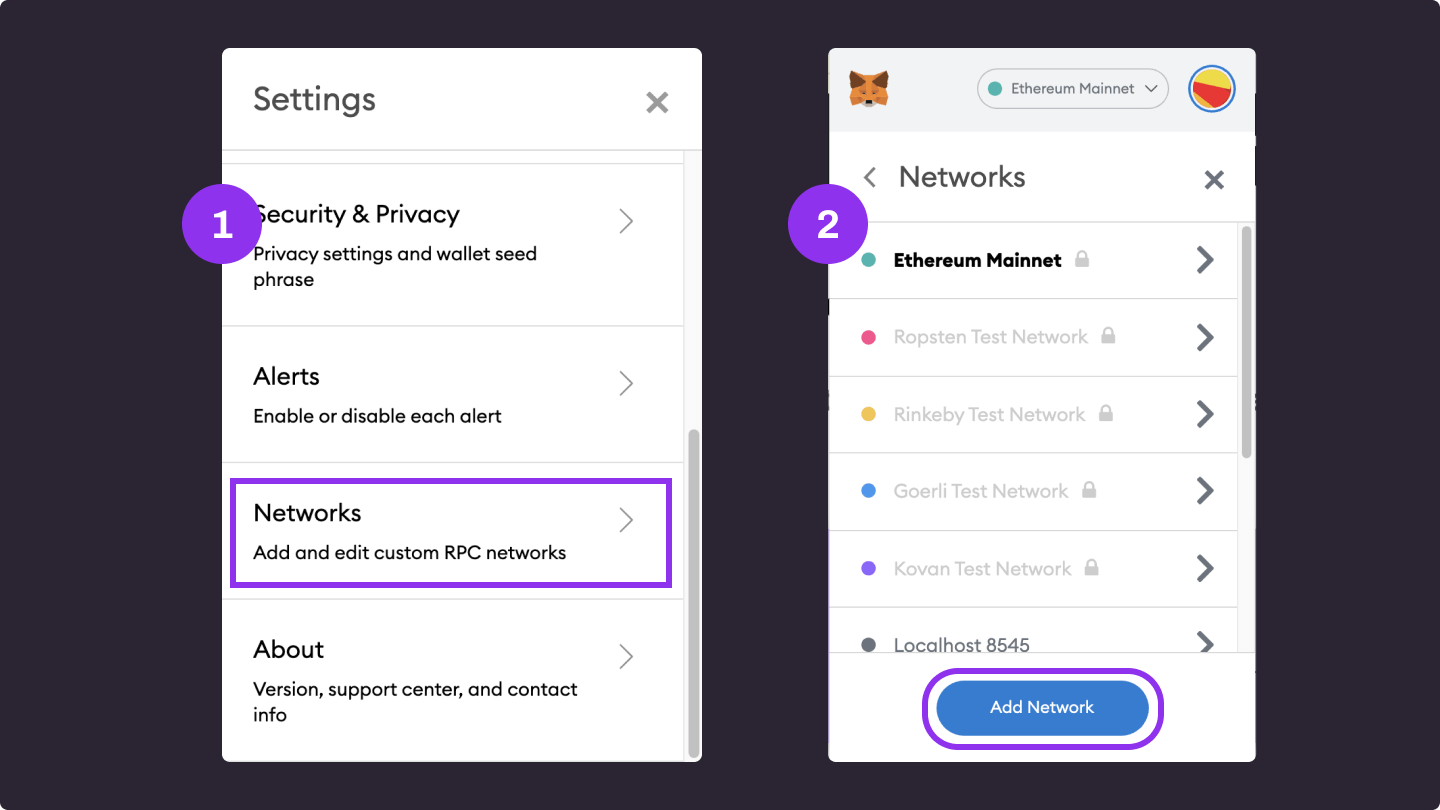
After this, you will be directed to the MetaMask website.
The process of adding Polygon to your MetaMask is almost similar on a mobile device. Just Click on the Hamburger Menu, go to the “Settings” page of your MetaMask wallet. After that, choose Networks and then click “Add Network”.
Back to our web version process:
From here, you will be redirected to the MetaMask page. Once on the redirected page, you are asked to fill in the form with the required information.
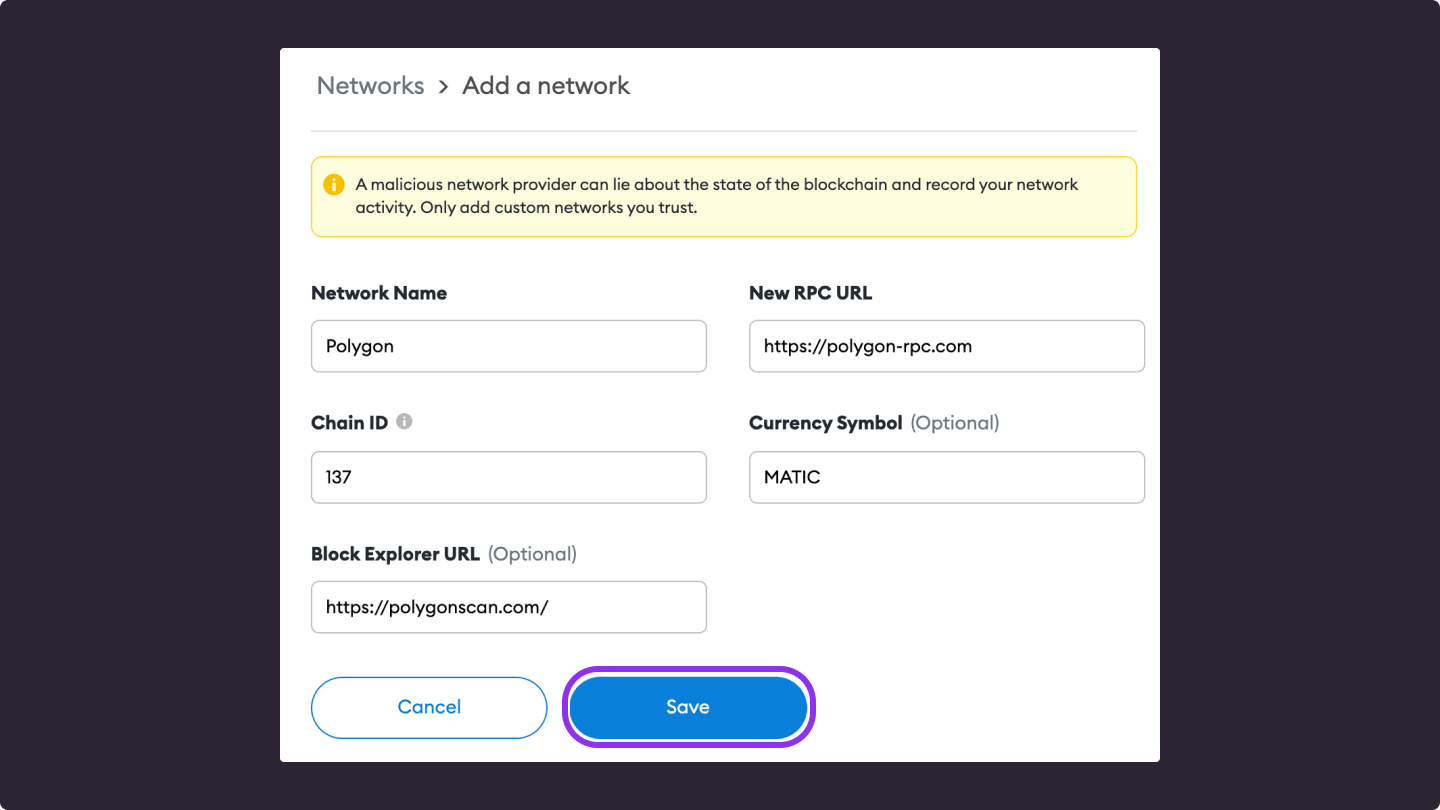
To assist you with this step, we have mentioned the key information as under. You just need to provide the correct information within its relevant field.
Network Name: Polygon
New RPC URL: https://polygon-rpc.com
ChainID: 137
Symbol: MATIC
Block Explorer URL: https://polygonscan.com/
Below, we have briefly described each of the above fields.
Network Name: This field represents the name of a network. In this case, type Polygon to add it to MetaMask.
RPC URL: Here, you need to provide a Polygon node URL. This is the address that you will be using when making transactions via a MetaMask wallet. Occasionally, an RPC node may go down. If this happens, you can try any of the alternatives listed below:
- https://rpc-mainnet.matic.quiknode.pro
- https://rpc-mainnet.matic.network
- https://rpc-mainnet.maticvigil.com
ChainID: You must provide an Ethereum chainID, which in this case is “137”.
Symbol: This field relates to the symbol of a native cryptocurrency available on a particular chain.
Block Explorer URL: It refers to an explorer that is associated with your connected blockchain. By visiting this URL, you can see the interactions related to smart contracts and transactions. The Block Explorer for Polygon is “polygonscan”.
After you have filled in all the fields, just hit the “Save” button. As a result, Polygon will appear among the other Networks available on the list. To make sure whether the Polygon network is successfully connected to your MetaMask wallet, just connect to OpenSea. If you are seeing your Matic tokens, you have added Polygon to MetaMask.
On the contrary, if you can’t find any of your Matic Tokens, it is advised to change the RPC URL. You can choose any of the three RPC URLs provided above. With this, you have successfully added Polygon to your MetaMask wallet. Now you can interact with Polygon without any hassle.
We hope you enjoyed the blog post. If you want to read more blog posts like this regularly, don’t forget to subscribe to our blog. And if you are looking for blockchain and crypto related jobs, make sure to check out our website.


